[INTRODICTION] [CREATE / MAINTAIN ALBUMS] [SEARCH DATABASE] [PRINT REPORTS] [PERSONAL] [DESIGN REPORTS] [IMPORT ALBUMS] [MISCELLANEOUS]
Printing Reports
Contents
|
|
Introduction 
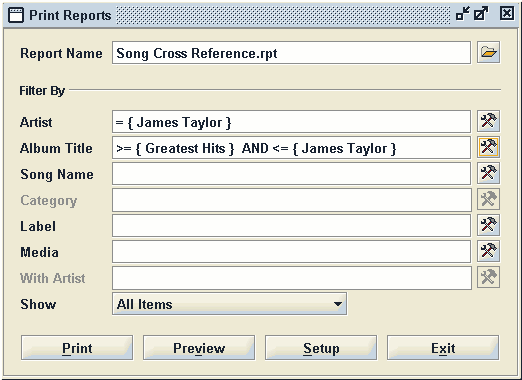
Your MusicDB comes with a few pre-defined reports, but a report designer is included to allow creation of custom reports. The printed report will extract all information from the database that matches the report design. With the use of filters, the data printed on a report can be limited. Figure 1 shows the Print Reports window with a couple of filters applied.

Figure 1 -- Print Reports window
The buttons at the bottom of the screen provide the normal print functions for print preview, printing to your printer and displaying a system print setup window where you can select the paper type, set margins, etc. The next section will explain how to create and apply filters to the report output.
Applying Filters 
Applying filters can greatly reduce the size of your reports, especially when the database contains several artists or is very large. The available filters that can be applied to any specific report will be activated when the report is opened. All others are disabled
To create a filter, click
the Build Filter button ![]() to the
right of the filter drop-down boxes.
This opens the Create Report Filter window. Figure 2.
to the
right of the filter drop-down boxes.
This opens the Create Report Filter window. Figure 2.

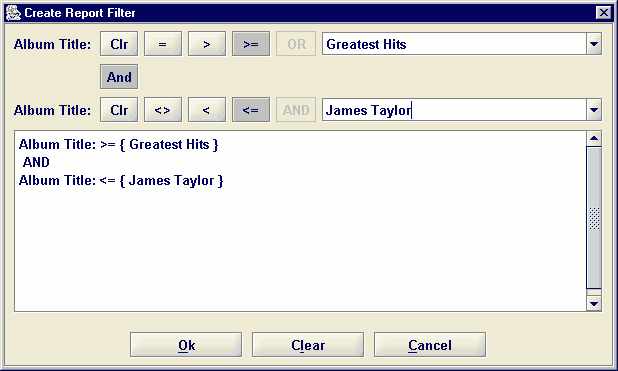
Figure 2 -- Filter Editor
The filter editor shows the name of the filter and the drop-down boxes contain all possible values for the filter. In Figure 2, an Album Title filter is being created and the drop-down box contains all albums in the database. Create the filter by selecting one of the operator buttons and a value from the drop-down box. The text area at the bottom of the screen shows what you have selected and is updated with every change in selection.
Operator buttons (=, >, >-, OR, <>, <, <=, AND) are activated and de-activated depending on what operator button you select. For instance, if the equal button in the upper argument is selected, the OR button as activated. Every selection of the drop-down box will add a value to the filter like "= {value1} OR = {value2}". For the other buttons, the OR button will be deactivated.
A similar situation exists for Not Equals (<>). Selecting the Not Equal button activates the AND button and successive selections in the drop-down box will create a filter like "<> {value1} AND <> {value2}".
Experiment with the buttons to build the filter of your choice.
When you are done click OK to return to the Print Reports window.