[INTRODICTION] [CREATE / MAINTAIN ALBUMS] [SEARCH DATABASE] [PRINT REPORTS] [PERSONAL] [DESIGN REPORTS] [IMPORT ALBUMS] [MISCELLANEOUS]
Importing Albums
Contents
|
|
Introduction To Importing Albums 
The Import feature in Your MusicDB provides a method for creating or updating multiple albums from a delimited text file. A delimited text file is simply a text file where each piece of information is separated by a specific character. Most spreadsheets have the capability of creating a delimited text file. The most common character used is the comma ,and they are commonly referred to as Comma Delimited files or CSV, although any character can be used for the separator character.
Open A Delimited Text File 
When the Import window is opened, the only thing that appears is the Artist drop-down box. The import process adds or modifies existing albums, and the artist must be selected so the information is applied to the correct artist. Once the Artist is selected, additional. The easiest way to learn the import process is to follow an example.
Follow these steps:
- Select Jerry Reed in the Artist drop-down box.
- Open the Demo.dbk database.
- Click the Folder button to the right of the Import File text box.
- Navigate to the imports folder in the File requestor that appears and select JerryReed.csv.
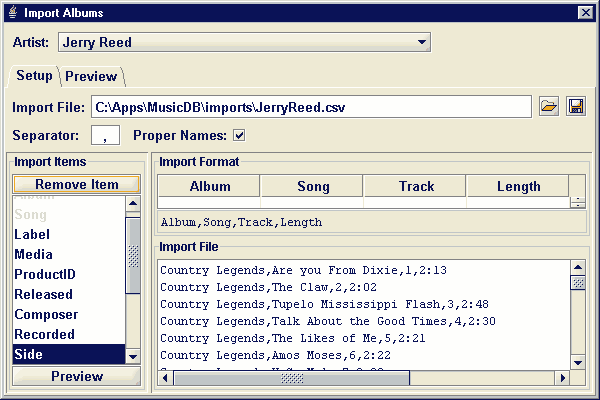
The display should now look similar to Figure 1. If you look closely at the information displayed in the Import File text area at the lower right of the window, you will see that the file contains the Album Title, Song Name, Track and Track Length. The delimiter in this file is a comma.
The default delimiter in Your MusicDB is a comma, but it can be changed to the delimiter found in the text file by typing the it in the Separator text box. Notice also the Proper Names check mark. If this is checked, during the preview explained below, all text items in the file will be converted to proper naming convention where each word is capitalized.
Look at the Import Format area. The default format contains a Side label and at the bottom, it reads Album,Song,Side,Track,Length. However, the import file does not contain a side, so we must remove the Side label from the Import Format. Click in the white area beneath the Side Label, then click the Remove Item button. The bottom of the Import Format area should now read Album,Song,Track,Length as shown in Figure 1.
if needed, other items can be easily added to the Import Format by clicking the appropriate item in the Import Items list. To change the order of the Import format labels, click and hold the mouse on the label, then drag it right or left to re-locate it. In this example, neither of these steps are needed. The important thing to remember is that the Import Format MUST be exactly the same as the text file.
Click the Preview button to proceed to the next step.

Figure 1 -- Import Albums window
Preview And Import 
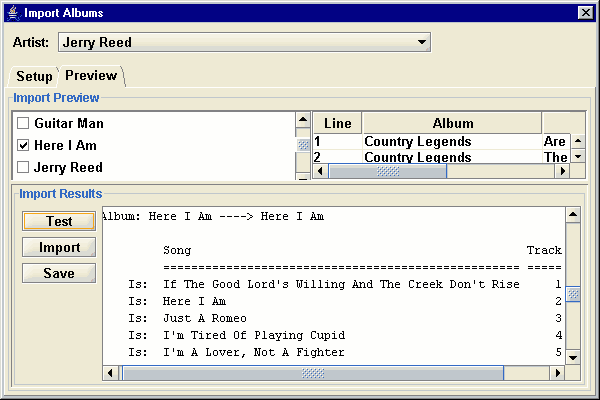
When the preview is first displayed, the Import Preview at the top of the window displays a list of albums located in the import text file on the left, and the detail of the text file on the right see Figure 2. The first thing that must be done is to select which album(s) to import from the text file.
For this example, only Here I Am is to be imported. Locate it in the left hand Import Preview list, and click it to place a check mark in the small square. Multiple albums can be selected, but the recommendation is to do only 4 to 5 at a time. The reason for this is during the Test step, if the results displayed in the Import Results text area are not what you expected, you can close the import window without modifying the database. A warning requestor will be displayed giving you the option to cancel the import.
What might you look for in the Import Results? The most obvious is incorrect spelling of Album Titles or Song Names. When viewing the test results, the word Add appears next to any new Album Title or Song Name that will be added during the actual Import. If you see any questionable Add's, cancel the import and correct the text file. Then try again. This prevents adding bad information to you database.
For now, click the Test button. When the test is completed, the results appears in the Import Results text area, Figure 2. Scroll through the results to see what will be added / modified in the database. Note, at this point, no database changes have been made.
The Import and Save buttons are now activated. The Import button makes the actual database updates as displayed in the Import Results text area. The Save button opens a file requestor so the Import Results can be saved to a text file for history purposes.
Click the Import Button to import Here I Am. At this point the import is complete. Close the window, then go to the Song / Album view and look up Here I Am to see how it was added to the database.

Figure 2 -- Import Albums results