[INTRODICTION] [CREATE / MAINTAIN ALBUMS] [SEARCH DATABASE] [PRINT REPORTS] [PERSONAL] [DESIGN REPORTS] [IMPORT ALBUMS] [MISCELLANEOUS]
Creating and Maintaining Albums
Contents
|
|
The Album Maintenance Window 
The Album Maintenance window enables you to create and maintain all information pertaining to an album. It has the familiar explorer type interface with an album explorer list on the left and album data on the right. An album contains the following elements, an album title, a media type (CD, LP, etc.), a manufacturer's label, a category or music genre and several tracks defined by a song title and possibly a secondary artist. All of these elements are maintained only once in the database and can be reused many times.
It's important to understand the difference between an "album" and an "album title". An artist may have released the same album as an LP, cassette and CD. That means we can have three albums in the database with the same album title. It also means that another artist may have an album with the same title. Once the album title has been entered the first time, it is reused for all other albums with the same title.
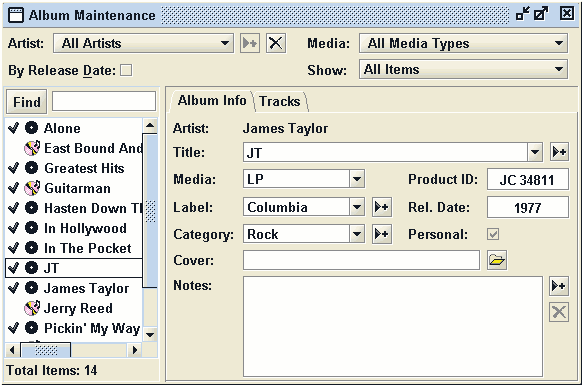
Figure 1 - Album Maintenance Window - Album Info Tab
Figure 1 shows all albums for all artists in the database. To limit what is displayed in the explorer:
- Select a specific artist from the drop-down box
- Select a specific media from the media drop-down box
- Show all albums, only those in your personal collection, or those not in your personal collection
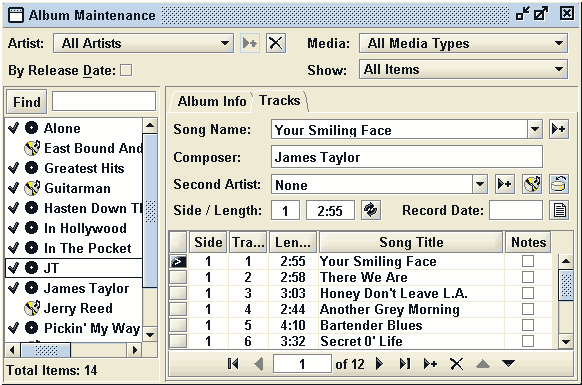
Figure 2 - Album Maintenance Window - Tracks Tab
Modifying An Existing Album 
The first step is to select an artist (or all artists) from the drop-down
box at the top left of the window to
activate the explorer. Immediately the album explorer will show all albums for that artist, with
icons indicating if they are in your personal collection
![]() and the media type
and the media type ![]() (an LP for
the selected album in Figures 1 and 2). Albums with no check mark indicates that they have not been
marked in your personal collection.
(an LP for
the selected album in Figures 1 and 2). Albums with no check mark indicates that they have not been
marked in your personal collection.
Left clicking the mouse on any album in the explorer will display the album detail. The view has two tabs at the top. The Album Info tab displays the basic information about the album, the artist, media, manufacturer, etc. The Tracks tab displays a table of all tracks on the album. As a track is selected by left-clicking on any column in any row, the track information above the table will change.
To change any information, either make a selection from the appropriate drop-down box or type into the appropriate text field. As you type into the drop-down boxes, they will automatically be filled with the item that most closely matches what you have entered. You do not have to worry about the upper or lower case when you type as the input is converted internally to upper case before making the search. To save your changes, either select another album from the explorer or close the window.
Creating A New Album 

Creating a new album is a very straight forward process. The recommended sequence is:
- Select the artist from the drop-down box.
- Click on the Add new album to the right of the artist drop-down box
- Enter data in the Album Info tab
- Enter data in the Track tab
- Sequence the tracks
- Enter the track lengths
Enter Data In The Album Info Tab
All information on the Album Info tab with the exception of the cover image and album notes are either a drop-down box or a standard text box. Clicking the Add new to the right of the drop-down boxes will open an appropriate window for data entry similar to Figure 3.
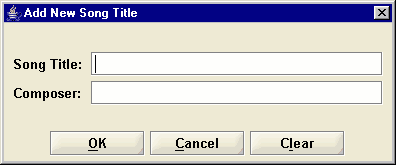
Figure 3 - Data entry window
Again, the case of the text entry is not important. To maintain consistency of the data, all information is converted to proper case with the beginning character of each word converted to upper case. This will be incorrect for many foreign names. If you so wish, you can use the Table Maintenance window to correct these names.
You can maintain cover images as part of your database, although they are not internally stored in the database. Rather just the path name to a folder on your computer is maintained. A suggestion would be to organize the images in the covers folder before adding them to the database.
At the bottom of the Album Info tab window is a section for keeping album notes. It is initially inactive and no data can be entered. To activate it, click the Add notes button to the right side of the text area. To delete the text and remove any notes for an album, click the Delete button at the right of the text area. Entering extensive notes is possible as there is no limit to what you can enter. Just be aware that extensive use of notes can add greatly to the size of the database and potentially create performance problems.
Enter Data In The Track tab
The Tracks tab contains the familiar drop-down boxes and text boxes for adding information. There are three ways the song tracks can be added selecting from an existing album, importing from a text file or through normal entry.
The first step to add a new track is to insert a new row in the track table. If it is for an
existing song, click the Add ![]() button in the table navigator. A new row will be added to the table with Not Assigned
as the song name. Select the song name from the Song Name drop-down
box
button in the table navigator. A new row will be added to the table with Not Assigned
as the song name. Select the song name from the Song Name drop-down
box
If it is a new song, click the Add song
![]() button to the right of
the Song Name drop-down
box. This will add a new row to the track table and open a
data entry window (see Figure 3.) for the new song. When the song and composer have been entered,
the track table will be updated.
button to the right of
the Song Name drop-down
box. This will add a new row to the track table and open a
data entry window (see Figure 3.) for the new song. When the song and composer have been entered,
the track table will be updated.
Finish entering the remaining information as applicable. You have the discretion of adding
track notes. Click on the Notes
![]() button and another
data entry window will open. After the notes are added, a check mark will appear in the Track table
to let you know visually which tracks have notes.
button and another
data entry window will open. After the notes are added, a check mark will appear in the Track table
to let you know visually which tracks have notes.
You may find it easier to skip entering the track lengths at this time, but rather add them as a final step described below in the Enter Track Lengths section. Also, the track sequence may not be correct, so complete the album creation by re-sequencing the tracks.
Selecting Tracks From An Existing Album 

Selecting tracks from an existing album is an easy way to duplicate an existing album released on a different media type. You should at a minimum that the track lengths are entered to eliminate re-entering them. Figure 4. shows the Select Tracks From Album window.
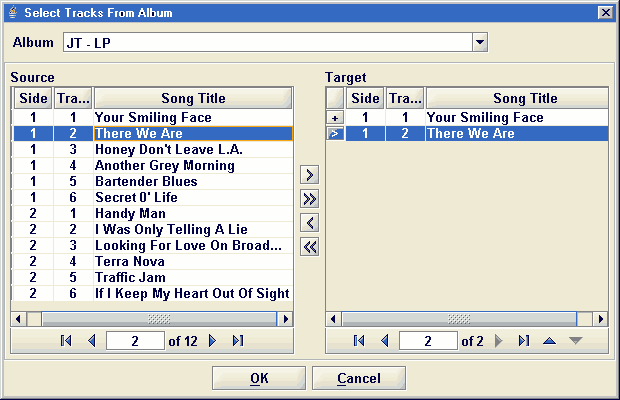
Figure 4 - Track selection
Initially, both the Source and Target will be empty. Select an album from
the Album drop-down
box and all song tracks on that album will be displayed in the
Source table. To copy to the Target table, highlight the tracks in the
Source table and click the Select button.
![]() To select all tracks,
click the Select All button.
To select all tracks,
click the Select All button. ![]()
To remove tracks from the Target table, follow the steps above, but click either the
Remove ![]() or Remove All
or Remove All ![]() button. When done, clock the OK button and you will be returned to
the Album Maintenance window. All items from the Target
will be added to the current album. To cancel the operation , click the
Cancel button.
button. When done, clock the OK button and you will be returned to
the Album Maintenance window. All items from the Target
will be added to the current album. To cancel the operation , click the
Cancel button.
Importing Tracks From A Text File 

This method for adding tracks to an album is especially useful if you have the information in a spread sheet. Most spread sheet programs provide the capability for saving the information in what is called a delimited format, which simply means the data elements are separated by a specific character. The most common format is comma delimited (CSV), where the data is separated by a comma. The best way to learn how to import is with an example.
In the imports folder of your installation folder there is a file called
JerryReed.csv that contains the information for several albums. We will use
that file to create a new album with a media type. Open the Demo database and
open the Album Maintenance window. When you select Jerry Reed in the
Artist drop-down
box, you will see an album called EastBound And Down with a
CD ![]() media type. We will create a new album with an LP
media type. We will create a new album with an LP
![]() media type.
media type.
- Follow the steps above to create a new album and on the Album Info tab, set the Title to East Bound And Down and the Media to LP
- Click on the Tracks tab
- Click on the Load from album button

- Click on the Open folder button to the right of the Import File text box
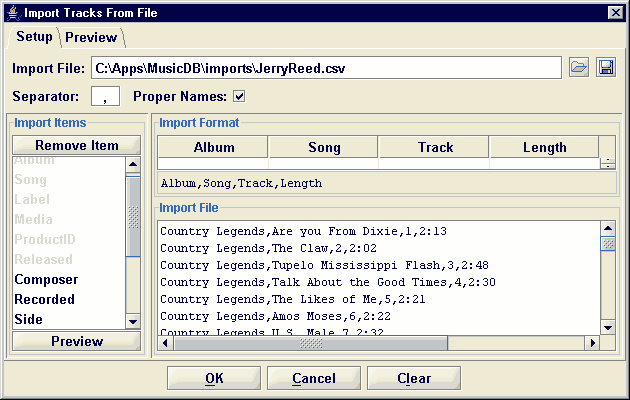
Figure 5 - Import tracks setup
The Import Tracks From File window should look something like Figure 5. If you look closely at the Import File area you will see that it contains the album title, song name, track number and track length. Just above in the Import Format area, the format text reads Album,Song,Side,Track,Length. The format text must match the actual format of the text file, so we need to remove the Side.
- Click in the white area beneath Side
- Click on the Remove Item button
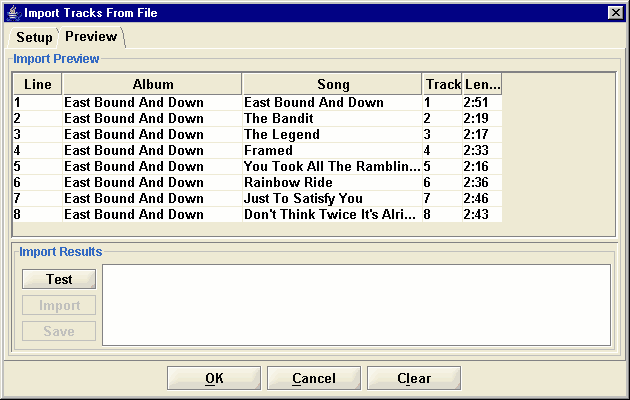
Figure 6 - Import tracks preview
The Preview displays the album information extracted from the text file in the table at the top of the window. At the bottom is a text area that will display the results of the actual import. Now click on the Test button, and the window will be updated as shown in Figure 7.
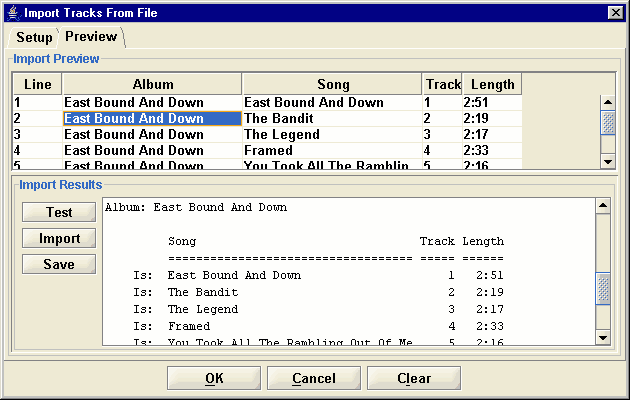
Figure 7 - Import tracks results
The results area will show the results of what will be imported. Your display will look slightly different than Figure 7. The Results area of the window can be made larger by dragging the separator between the Import Preview and Import Results sections of the window. Notice also that the Import, Print and Save have become active. To complete the import, click the Import button. and you will be returned to the Album Maintenance window with the new tracks added to the track table at the bottom of the window.
More information on importing into the database is available in the Import Albums section of the documentation. To complete the creation of this album, you just need to sequence the tracks
Sequencing Tracks 
You may have noticed that there is no way to enter the track numbers, as this is done automatically. In fact, after any change to the track information, re-sequencing takes place.
- Entering a side number in the Side text box
- Adding a new track
- Repositioning using the Move Up
 or
Move Down
In the import example above, the tracks will show side "1" for all tracks and track numbers from "1" to "8". For an LP we know this is incorrect as it has two sides. Click anywhere on row five in the table and enter "2" in the Side text box. The table will change to show side "1" -- track "1-4" for the first four rows and side "2" -- track "1-4" for the next four rows.
Entering Track Lengths 
Although you can enter lengths as you enter the individual tracks, you will probably find it easier
to add them after all tracks have been entered. To start the entry, click on any column of the
track table and then click in the Track text
box. Enter the track length, and press
the Tab or Enter key on your keyboard. The track table will be updated
with the length. Automatically, the next track appears in the Track
text box and you
can enter the next length. Continue adding the lengths until they have all been entered.
Deleting An Album 
To delete an album, select the album from the explorer so it displays in the Album Info
tab. Click on the Delete ![]() button to the right of the Artist drop-down
box at the top of the window. A warning
message will appear asking for confirmation on whether the album should be deleted. If you respond
YES all information pertaining to the album will be permanently removed from
the database and cannot be restored. If you accidentally click the Delete button,
respond with a NO and the delete action will be terminated.
button to the right of the Artist drop-down
box at the top of the window. A warning
message will appear asking for confirmation on whether the album should be deleted. If you respond
YES all information pertaining to the album will be permanently removed from
the database and cannot be restored. If you accidentally click the Delete button,
respond with a NO and the delete action will be terminated.