[INTRODICTION] [CREATE / MAINTAIN ALBUMS] [SEARCH DATABASE] [PRINT REPORTS] [PERSONAL] [DESIGN REPORTS] [IMPORT ALBUMS] [MISCELLANEOUS]
Designing Reports
Contents
|
|
Introduction To The Report Designer 
The Report Designer enables you to create reports from the information in the database. There are two ways a report can be designed. The first method is to start with a blank report. Drag items from the General area or the Items areas on the left of the window and drop them onto the report design area on the right of the window. For very simple reports, this might be the best method.
The second method is to create a basic report using the Report Wizard to select report items to be printed. This method is probably the most useful as it will create the report for you and all that is needed is to resize the widths of the items and align them to make an attractive report.
Figure 1 shows one of the reports that is included with Your MusicDB. The best way to get accustomed to using the Report Designer is to actually create this report from scratch, using the Report Wizard. You can view the actual report by opening it in Print Reports window and clicking the Preview button.
Reports in Your MusicDB are split into three separate areas, Report, Page and Detail. Each area can have an associated header and footer. The Report header prints at the top of the first page, and the Report footer at the bottom of the last page. The Page header prints at the top of every page and the Page footer at the bottom of every page.
Looking at Figure 1, notice that the Page Header bar contains the word Artist. This means that every time the artist changes, a new page will be printed and in this case since, the artist is included in the report area, it will be printed at the top of the page to the right of the title (Album Report).
The detail, which represents the bulk of the information on a report has three separate areas, a header and footer, as well as the detail area itself. Referring to Figure 1, notice that the Detail header area contains the Album Title and Media as well as some headings for Side, Track, Length and Song Name. As Album Title and Media are included in every detail record extracted from the data base, they are included in the Detail header so they only print when the Album Title changes along with the headings. If you look at the at the separator bar above the Detail header area, it reads Detail Header - Album Title 0.38". This can be interpreted to mean, print the detail header every time the Album Title changes and allow a spacing .38" for printing the information.
Similarly, the Detail footer will print the Total Playing Time before printing a new Detail header. The detail footer includes one of the Sum from the General area and totals the track Length before printing.
At a minimum, every report has a Page header area and a Detail
area. The remaining headers and footers are optional.
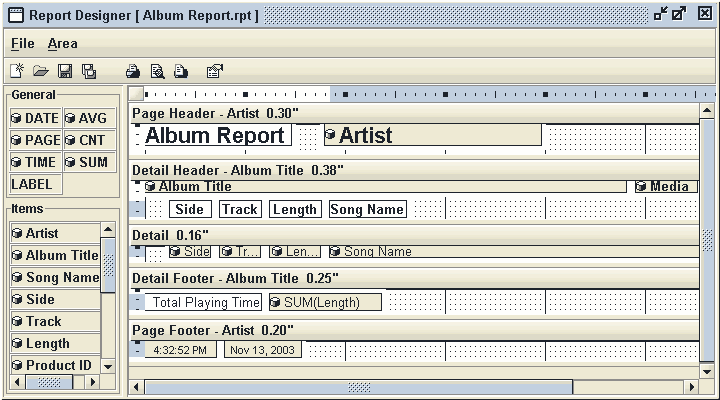
Figure 1 -- Report Designer window
The Report Wizard
To activate the Report Wizard, select New from the Report
Designer File menu, or click on the New Report
button. The Report Wizard opens with NewReport
in the Report Name text box, the Available Items
list shows all items that can be added to a report, and the Selected Items
is empty. Items are added to the report by highlighting them in the Available
Items list and clicking the Select Item button ![]() to add them to the Selected Items list. To remove a Selected
Item, click the Remove Item button
to add them to the Selected Items list. To remove a Selected
Item, click the Remove Item button ![]() .
.
At this point it does not matter how they are ordered in the Selected Items list. For now, add the items from the Available list to the Selected list as shown in Figure 2. When done, click the Next button to proceed to the next step.
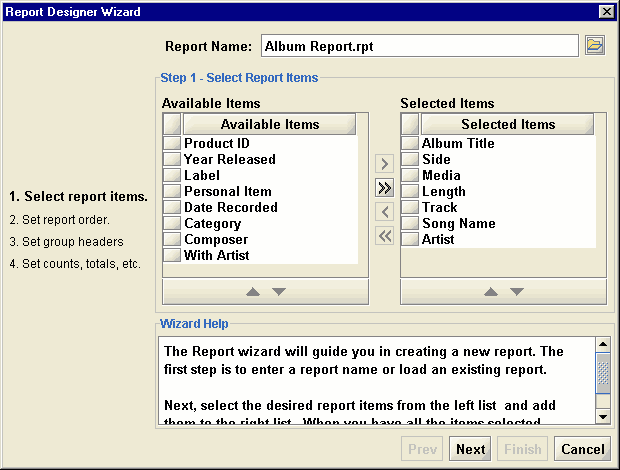
Figure 2 -- Report Wizard step one
Step Two - Ordering The Report
This step tells the wizard how we want to extract the information from that database, or the order of the data. For this report, the order will be Artist, then all Albums for that artist, then all Media types for the albums, then the Side of each media type, then the Song Tracks for each side. There is no need to add the Track Length or Song Name as there is only one song for a specific Track on an Album.
As above, add items from the Report Items list to the Order
By list. If you determine that you do not have them arranged
properly in the Order By list, highlight the item and click the Up
![]() and Down
and Down ![]() buttons at the bottom of the list to reposition the item.
buttons at the bottom of the list to reposition the item.
If you are creating a report, ensure that the items in your Order By list matches Figure 3. When done, click the Next button to proceed to the next step.
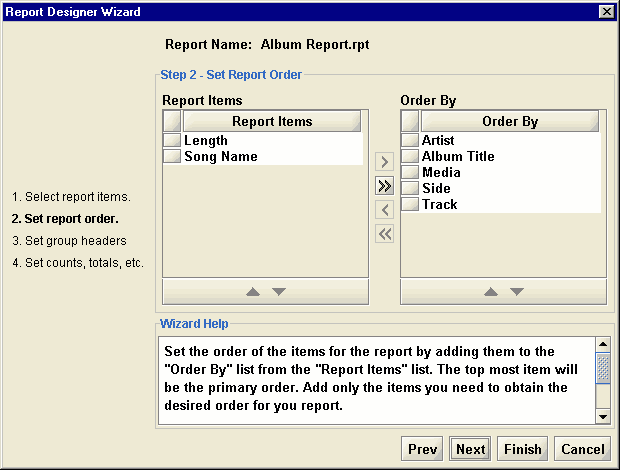
Figure 3 -- Report Wizard step two
Step Three - Create the Report Area Headers
Now it's time to tell the wizard in which header to print the ordered report items. Each report item cal also be sorted in ascending or descending sequence. The default is ascending sequence. To change the sort sequence for a report item, select the sort sequence from the corresponding drop-down box. For this report, leave them all as default or ascending.
Refer to Figure 1 and notice that the Artist is printed in the Page Header, and the Album Title and Media in the Detail header. To accomplish this, a check mark is placed in the Page column for the Artist, and check marks placed in the Det column for the Album Title and Media.
Even though the Side and Track were used as part of the order for this report, they are to be printed in the Detail area and thus no check marks. See Figure 4.
When done, click the Next button to proceed to the next step.
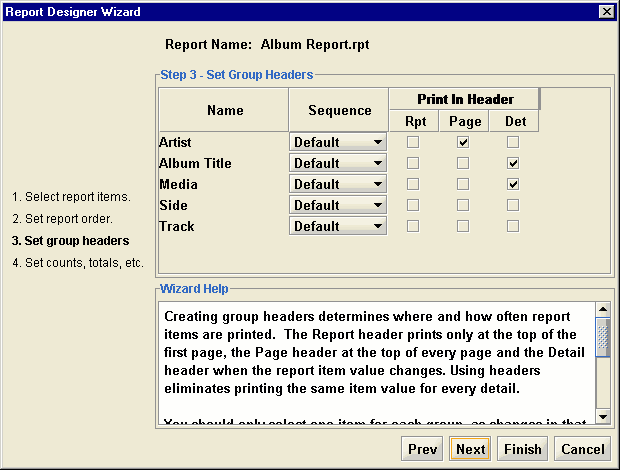
Figure 4 -- Report Wizard step three
Step Four - Create the Report Area Footers
In this step, controls can be added to the report and included in any or all of the footers. The Cnt control will print the count the number of detail items printed. The Sum control will print summation of a numeric detail item. The Avg control will compute the average of a numeric detail item, or in other words divide the Sum by the Cnt. All items are reset to zero after the corresponding footer is printed.
Note: there is no Sum or Cnt available for Artist, Album Title and Media. These report items are alphabetic and thus no mathematical operations can be performed on them.
For this report, the total Track Time is wanted, so place a check mark in the Sum column. Although we could print the total Track Time in each footer, Page, Report and Detail, Figure 1 shows it only in the Detail footer. Place a check mark in the Det column to print the Track Length Sum in the Detail footer, see Figure 5.
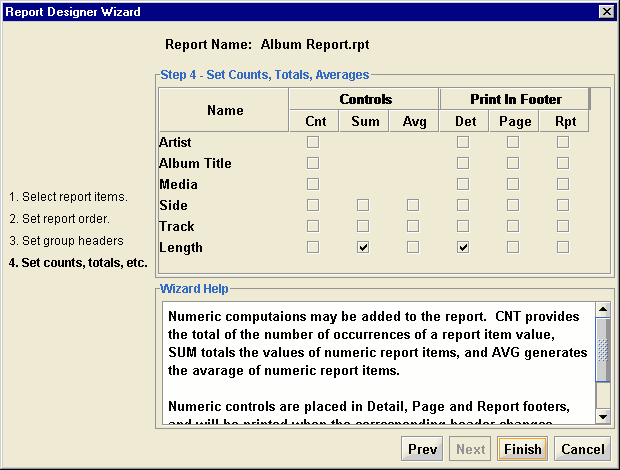
Figure 5 -- Report Wizard step four
At this point the wizard has all needed information to create the report. If at any time, you discover that you may have made an error, click the Back button to return to a precious step.
Click the Finish button to create the report as shown in Figure 6.
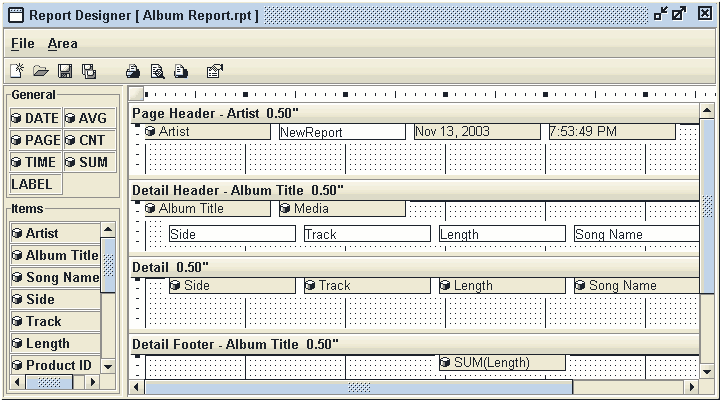
Figure 6 -- Report design from wizard
If you compare Figure 6 to Figure 1, notice that all the items are present, but not the same as the finished report. By default the wizard adds the Date an Time to the Page header, but the final report has them in the Page Footer. It also sets the area spacing to .50".
The wizard has no idea as the the printable width of the report items coming from the database, so it makes them all the same width. What remains to be done is to resize the items and adjust the area spacing. The following topics explain how to modify database and control items (colored background), modify text items (white background), and adjust the area spacing.
Modify Database And Control Items
The database and control report items have a colored background. Database items also have a small database image on the left side of the item. Clicking on one of these items results in small solid black sizing squares on the corners, the center of each side and the center of the top and bottom. Moving the pointer over one of the black squares changes the cursor to a double arrow that shows how the item can be resized. Moving the cursor along one of the edges changes the pointer to a four-arrowed cursor and item can be moved anywhere in the report area.
A second method of modifying an item is using the Properties window.
Open the properties window by selecting Properties from the Report
Designer menu or clicking the Properties ![]() button in the Report Designer toolbar.
button in the Report Designer toolbar.
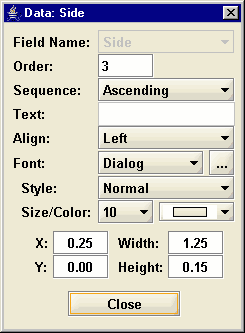
The properties that can be changed for any item will be activated in the properties window. Click on the Side database item in the Detail area. The properties for the Side item is now displayed in the properties window. The Side item alao has the small black resizing handles. Click on one of the handles to get the a double-arrow cursor and hold the mouse button down. Drag the mouse and the Width and Height in the Properties window change. Click along one of the sides of the Side item to get the four-arrow move cursor. While holding the mouse button down, drag the item and observe the X an Y values change.
Set the dimension for the Side, Track, Length and Song Name to the following by typing the values in the appropriate text box or drop-down box in the Properties window.
- Side -- X = 0.25 Y = 0.00 Width = 0.40 Height = 0.11 Align = Center
- Track -- X = 0.75 Y = 0.00 Width = 0.40 Height = 0.11 Align = Center
- Length -- X = 1.25 Y = 0.00 Width = 0.50 Height = 0.11 Align = Center
- Song Name -- X = 1.85 Y = 0.00 Width = 3.85 Height = 0.11 Align = Center
The detail area should now match Figure 1.
You can Experiment with changing the font, font size, font color and other properties at your convenience. All that's left is to resize the area.
Modify Text Items
Text items used for report titles, detail headers, etc., have a white background with a solid black outline. They are editable by clicking anywhere on the text. The current text can be deleted, or additional text can be added. If you have followed the steps above, click into the label that contains NewReport. Delete the text and replace it with Album Report.
As with database and control items, text items can be resized and moved. To display the resize handles, click on the black outline that surrounds the text item. They can then be moved or resized with the operations described above.
Before we proceed with modifying the the font size and style, right click the mouse over the Date item in the Page header. From the pop-up menu that appears, select Delete. Do the same for the Time item. There are other options in the pop-up menu, such as Left, Right and Center Alignment, Size To Font and Snap To Grid that you can experiment with as time permits. The Snap to Grid is set to on for all items as they are added to the report. The Size to Font should only be used for Text items as it changes the size of the item and that is not desirable for database items.
Click on the Artist item and move it to the right side of the Page header.
With the Properties window open, click on the outline of the Album Report item to get the resize handles and display the Album Report properties in the Properties window. Change the following properties.
- Font Size = 16 Font Style = Bold X = 0.00 Y = 0.00 Width = 1.45 Height = 0.21
Click on the Artist item and change the following properties
- Font Size = 16 Font Style = Bold X = 1.80 Y = 0.00 Width = 2.20 Height = 0.21
The items in the Page heading area should now resemble those in Figure 1. All that remains is to set the spacing. There are several text items in the Detail header that represent the headings for the detail items. These all should be resized to match the corresponding item in the Detail area. You should also resize the Album Title and Media database items so they appear similar to Figure 1.
Adjust Area Spacing
Each report area is separated from the one below by a moveable separator. Move the pointer towards the bottom of the report area until it changes to a vertical double-arrow cursor. Click and hold the left mouse button and drag it vertically to change the size of the area. Notice that the area height changes in the area title bar as you move the cursor. With the Properties window open, you can also click on the area title bar and change the Height property.
Change the title bar spacing to the following:
- Page Header = .30"
- Detail Header = .38"
- Detail = .16"
- Detail Footer = .25"
- Page Footer = .20
At any time, you can click the Print Preview button to view the report.
Add Items To A Report
Items that can be added to a report design appear in either the General or Items sections on the right of the screen. The general items include Date (print the current date), Time (print the current time), Page (print page numbers), Sum, Cnt, Avg and Label (text item) controls. The other controls were covered in the Report Wizard.
The database information that can be added to a report are in the Items section.
To add an item to the report, click and hold the mouse button on the desired item. Drag the mouse to the report area where you want the item to appear, then release the mouse. The item will now appear in the report area with the resize handles displayed. Move and resize it as explained above.
Recall the Date and Time controls were deleted from the Page header when the report title was changed. In Figure 1, they appear in the Page Footer. Add both items to the Page footer, then resize them as desired.
Summary
This topic has covered almost all aspects of designing a report. With a little trial and error, a report design can be completed relatively quickly and provide an attractive hard copy of the database information. The most difficult thing you might encounter is setting the order of the database items. It is highly recommended that you use the wizard to create the basic report. If it is not exactly what you want, save the report first, then when you start the wizard, load the saved report. All size and font information is retained as you progress through the wizard steps. In any of the steps, you can make changes such as adding additional database items, changing the order, adding footer controls, etc.
When the wizard is complete, you have a new report with the changes you have made and most formatting is retained. Good luck in your report design and don't hesitate to contact El-Kay Software with any questions you may have.
![]()