Soundfont Installation and Customization
These instructions are written for users of Creative Labs' SBLive! soundcards. Specific instructions are
given assuming you are using the software shipped with the soundcardĀĀIf you are using other soundcards or
other software, please check the documentation or websites specific to your soundcard/application for
instructions.
Unzip/uncompress the soundfont file if required.
Soundfonts found on the internet are usually compressed.Ā Some are standard zipped files, while others
use specialized compression using programs like SFArc or
SFPack.ĀInstructions will generally be given on the web page as to which compression program
is used.Ā They also will normally have links to download the programs.Ā Once downloaded, uncompress the
soundfont and place it in a folder where you can find it.ĀĀOnce uncompressed, it will be in the format
"Soundfont-Name.sf2".
Definitions
- Soundfont Bank:Āa collection of samples for each standard MIDI instrument (pianos, guitars, percussion, etc). There are also banks of specialized sounds that are less useful. A standard bank will always have the specified instruments in the same order, so a Nylon string guitar is always (024), acoustic steel string (025), etc. Thus if you change the entire bank, playing midi songs will have the proper instrumentsĀĀ
- Instrument SoundFont: a soundfont for a specific instrument (nylon guitar, acoustic steel string guitar, etc.) Useful for overriding or replacing an individual instrument in your current soundfont bank.
Contents
Installing a Soundfont BankĀĀ [Top]
1. Start the Creative Labs - Soundfont application
| In the SB-live software installation, the SoundFont application is part of the Creative Launcher.Ā Start the Creative Launcher and then select the Audio HQ tab at the top.Ā This gives you a bar which includes a choice showing SoundFont.Ā Clicking on the SoundFont starts the application.Ā The actual program is called ctsfont.exe, and can also be started directly under Windows using "Run.." from the Start bar. |
Click for larger view |
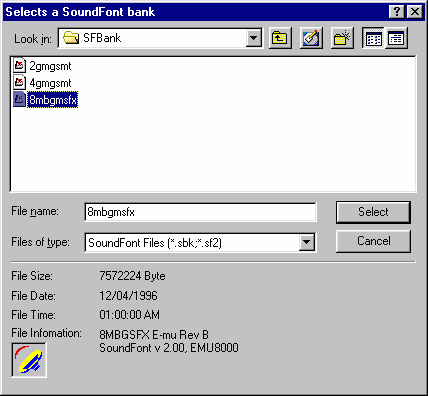
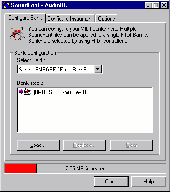
2. Browse to where the SF2 file is located and select it.
|
Select the soundfont file you wish to install from the proper disk drive and directory/folder.Ā This will vary depending on where you have stored the soundfont files on your particular machine.
IMPORTANT!!ĀYou must have enough memory to accommodate the soundfont.Ā If you don't have enough available memory, the soundfont won't load.Ā If it doesn't load, set the cache to a larger size
|
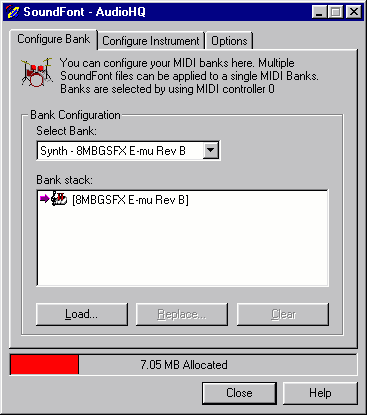
- Click on the Configure Bank tab at the top of the dialog if it is not the active tab.
- Click the "Load" button to bring up the standard Windows file browsing dialog.
- Select the soundfont file you wish to install from the proper disk drive and directory/folder.
Note:Ā For the SB-live! soundcards, soundfonts are stored in a memory cache allocated within the system RAM of your computer.Ā I recommend that you first explicitly clear any soundfonts currently loaded in the cache to free up memory before you load the replacement soundfont.Ā This is done by highlighting the currently installed soundfont in the Bank Stack window area and clicking the [Clear] button.
|

Click for larger view |
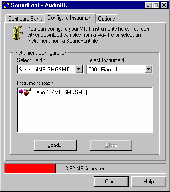
3. Enjoy Your MIDI files!
|
Once the soundfontĀ bank is installed as described above, you can play MIDI files and you will get the sounds from the new soundfont bank rather than the sounds in the soundfont you previously had installed.Ā Hopefully, the soundfont back you have just loaded will contain all of the standard midi instruments.
You must be configured to use the hardware synth driver capability (A-SB Live! MIDI Synth or B: SB Live MIDI Synth, not the software synth driver Creative S/W Synth,Ā See Setting the Default Midi Synth.Ā The other option is to select the synth driver in your application program.Ā See your application help file for instructions
|
Click for larger view |
Over-riding a Soundfont InstrumentĀĀ [Top]
1. Start the Creative Labs - Soundfont application
| In the SB-live software installation, the SoundFont application is part of the Creative Launcher.Ā Start the Creative Launcher and then select the Audio HQ tab at the top.Ā This gives you a bar which includes a choice showing SoundFont.Ā Clicking on the SoundFont starts the application.Ā The actual program is called ctsfont.exe, and can also be started directly under Windows using "Run.." from the Start bar.
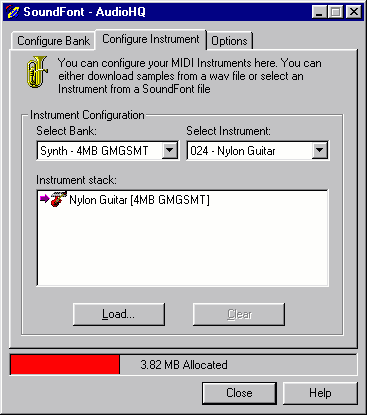
Click on the Configure Instrument tab at the top of the window.
|
Click for larger view |
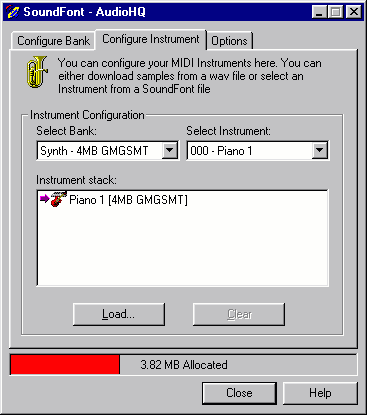
2. Select the Instrument to be replaced
- Select the instrument to be over-ridden in the Select Instrument drop-down box.
- The list of instruments loaded in the cache will be listed in the Instrument stack.Ā The active instrument will be at the top of the stack and has a small right arrow to the left of the instrument name.
- Although you can stack several soungfonts for the same instrument, they all reside in system RAM, so I would suggest removing any stacked instruments.Ā This is done by highlighting the instrument name in the stack and clicking the [Clear] buttonĀ
Note: The default instrument from the currently loaded soundfont bank cannot be cleared.
|
Click for larger view |
3. Browse to where the SF2 file is located and select it.
| Select the instrument soundfont file you wish to install from the proper disk drive and directory/folder. This will vary depending on where you have stored the soundfont files on your particular machine.
IMPORTANT!!ĀYou must have enough memory to accommodate the soundfont!Ā If you don't have enough available memory, the soundfont won't load.Ā If it doesn't load, set the cache to a larger size
|
- Click the [Load] buttonĀ to bring up the standard Windows file browsing dialog.Ā
- Select the soundfont Instrument file you wish to install from the proper disk drive and directory/folder.
|

Click for larger view |
4. Enjoy Your MIDI files!
| Once the soundfont instrument is installed as described above, you can play MIDI files, and you will get the sounds from the new instrument soundfont rather than the sounds of the instrument in the installed soundfont bank.
You must be configured to use the hardware synth driver capability (A-SB Live! MIDI Synth or B: SB Live MIDI Synth, not the software synth driver Creative S/W Synth,Ā See Setting the Default Midi Synth.Ā The other option is to select the synth driver in your application program.Ā See your application help file for instructions
|

Click for larger view |
Creating a Custom Soundfont BankĀĀ [Top]
You can create a customized General MIDI (GM) soundfont bamk which permanently
includes your preferred instruments rather than the defaults from the soundfont bank
you are currently using. This way, you can create a single soundfont bank with the best
instrument sounds, useful for all MIDI file playback.Ā The instructions below are written
assuming that you are using version 2.3 of the Vienna soundfont
editor. You can obtainĀversion 2.3 of Vienna, available
as a free download from the Creative Labs website
(http://www.soundblaster.com/soundfont/downloads.asp).
Changes made in the latest version of Vienna (2.4) make it much easier to create
custom soundfont banks. You can download this version of the program at the link above. Instructions
for creating a custom soundfont bank using Vienna 2.4 are available as a
flash tutorial.
1. Make a COPY OF the soundfont bank !!!
You will want to work on a copy of the GM soundfont bank, not the original.Ā That way, if you mess things up, you can always start again using another copy of the original soundfont bank.
2. Open the copied soundfont bank into the Vienna editor
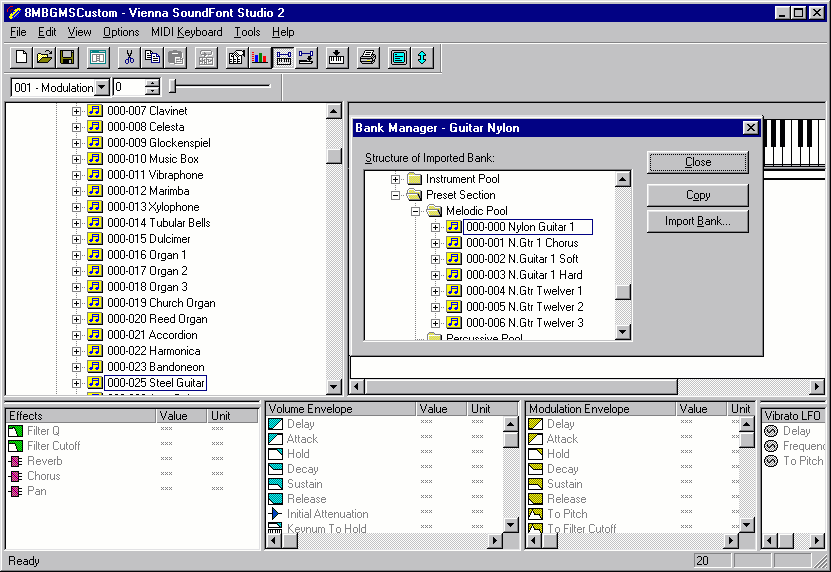
In the example below, I am using a copy of the 8MB GM soundfont that shipped with my soundcard.Ā This file was originally named "8mbgmsfx.sf2", and the copy I made to work with is called "8mbgmwCustomt.sf2".Ā If you copied the file from a CD, you may have to change the file properties to remove any "read-only" status in order to edit the file.
3. Delete The Existing Instrument You Wish to Replace.
- Expand the Melodic Pool in the tree view on the left side of the window.
- Highlight the instrument to be deleted ("Nylon Guitar" in this example). Take
notice of the bank and preset numbers currently assigned to this instrument
(000-024 for Nylon Guitar)
- Press the [Delete] key on your keyboard.
- After verifying the delete, the instrument will be removed.
|

Click for larger view |
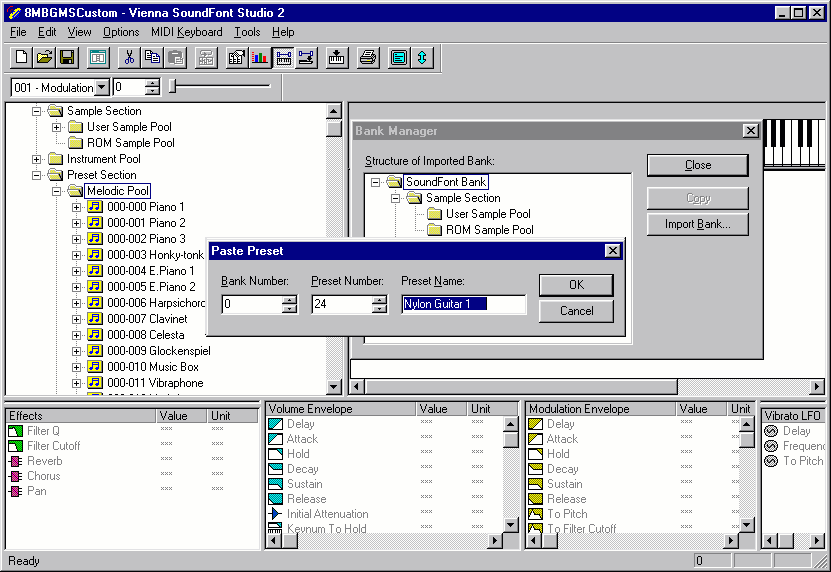
4. Import the replacement instrument.
- Select Bank Manager from the File Menu.Ā This opens apop-up Bank Manager window as shown.
- Click the [Import Bank]button and using the file browse dialog that opens, select the soundfont containing the instrument you wish to import.Ā In this case, I will import the first instrument patch from a nylon guitar soundfont ("Guitar Nylon.sf2").
- Expand the Melodic Pool in the Bank Manger window and highlight the instrument you want to import ("000-000 Nylon Guitar1").
- Click the [Copy] button in the Bank Manager window.
- With the Bank Manager window still open, move the mouse over to the main Vienna tree view window and right-click the Melodic Pool folder.Ā Select Paste Preset in the context menu that opens.
- A pop-up window opens allowing you to set the bank and preset numbers, as well as the name of the imported instrument.Ā Use the same bank and preset numbers for the imported instrument as the instrument you previously deleted (000-024Ā for Nylon Guitar).
After accepting the values, Vienna will import the instrument and all
of the underlying samples assigned to it automatically. You can then close the Bank
Manager window.
|
Click for larger view
Click for larger view |
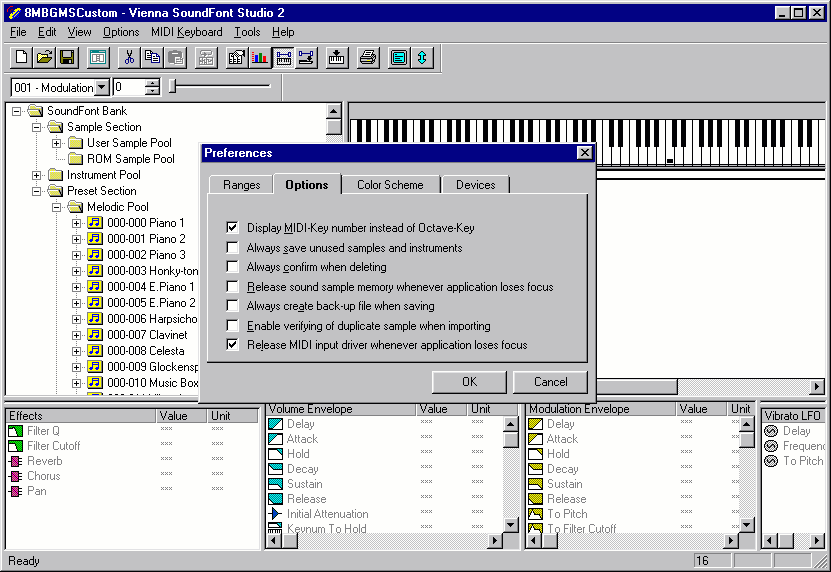
5. Save the modified soundfont bank..
First, set the preferences in Vienna to delete any unused samples.Ā This will remove the samples associated with the old instrument you deleted, and keep the soundfont from getting excessively large in size due to a glut of unnecessary embedded samples in the file.
- Select Preferences from the Options menu.
- Remove the checkmark next to Always save unused samples and instruments
- Select Save from the File menu to save your custom soundfont.
- Close the Vienna program and install the new sounfont bank.
Note: Older versions of Vienna works in just the opposite manner.Ā You must place a checkmark next to Discard unused samples and instruments when saving
|
Click for larger view |
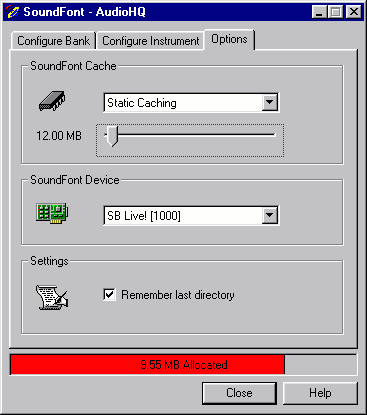
Setting the Soundfont Cache SizeĀĀ [Top]
- Double-click the Options tab at the top of the SoundFont - AudioHQ dialog
- Move the slider in the SoundFont Cache section to change the cache size
- Click on either the Configure Bank or Configure Instrument tab to continue loading the soundfont
|
Click for larger view |
Setting the Default MIDI SynthĀĀ [Top]
- Double-click the Multimedia icon in the Control Panel.
- Select the MIDI tab at the top of the dialog.
- Select the appropriate midi synth driver in the Single Instrument list
- Click [OK] to close the dialog and your default will be set.
|

Click for larger view |