[LESSON 1] - [LESSON 2] - [LESSON 3] - [LESSON 4]
Creating Fingerstyle Guitar Arrangements :: Lesson 1
While reading many guitar forums, I see many requests for tablatures for popular songs. Due to the copyright restrictions on making tablatures freely available on the internet, many tabs are no longer available, so you may find yourself having to create your own. The intent of these lessons is to provide an approach to arranging music for fingerstyle guitar. I think I can speak for many experienced players that there is nothing more rewarding then to have someone ask after hearing you play a song, “Where did you get that arrangement?” You will beam with even more pride when they learn it and play it for you.
To get the most from these lessons, you will need a notation program that has tablature capability. For PC's you have several options, GuitarPro, PowerTab and TablEdit are three of best. If you have one of these, you are all set. If not, the price of PowerTab (free) makes it an excellent choice. If you have a Mac, from what I know, your choices are more limited. I do know that GuitarPro and TablEdit have Mac versions. I'm not sure what other programs are available for Mac's.
These lessons are geared for fingerstyle guitar arrangements and assume you have a basic understanding of note durations. If you need a review, musictheory.net has a series of lessons that explains note durations, measures, time signatures and much more. The lessons are designed for beginners and are highly recommended. These arranging lessons use both standard notation and tablature, so knowledge gained at musictheory.net will be a tremendous aid as you start the path to creating your own arrangements.
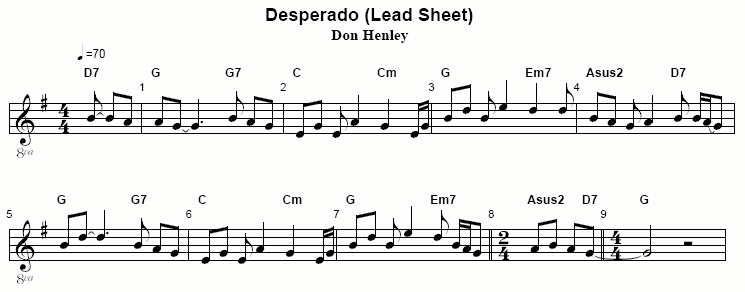
The starting point for any arrangement is the song's melody and chord progression. I have included a lead sheet for the nine measure verse of Desperado that shows the melody and chord progression. We will use this lead sheet in this lesson.

The lead sheet shows two items that need to be set in your notation program before entering any notes. Set the tempo to 70 beats per minute (the small ¼ note = 70 above the first D7 chord) and set the key signature to one sharp (key of G).
Looking at the lead sheet one more time, it begins with a partial measure with only three 1/8 notes, called a pick-up measure. The remaining measures are complete measures, and they have a small number above the bar line at the beginning of each measure. When measure 1 is mentioned, it will mean the first complete measure, which in this lead sheet is the one with G and G7 chord names above the notes. The partial measure will always be called the pick-up measure. Now, let's get started.
Base Arrangement
The first step in the arrangement process is what I call creating a base arrangement. It consists of a single note melody line referred to as the upper voice, and a single note bass line referred to as the lower voice. Creating the upper voice is straight forward, enter the notes into the notation program as they appear in the lead sheet. Ensure that the tied notes in the pick-up measure, measure one (1), measure five (5) and from the last note in measure eight (8) to the first note in measure nine (9) are entered correctly. Also notice that they threw us little twist in measure eight (8). The time signature changes to 2/4, and then returns to 4/4 in measure nine (9). This is not a common practice, but you will run across it from time to time. Just make sure you change measure eight (8) to 2/4 time signature.
When done entering the upper voice, play the tablature to determine if it sounds correct. If not, go back and make adjustments until it does.
In a fingerstyle arrangement, the lower voice duplicates what a bass guitar player would be playing. Most of the time the bass guitar will play the root of the chord at each chord change. Knowing that chord names start with the root note (G is the root of G7, E is the root of Em7, etc.), the lower voice can be created by entering the root of the chord names from the lead sheet.
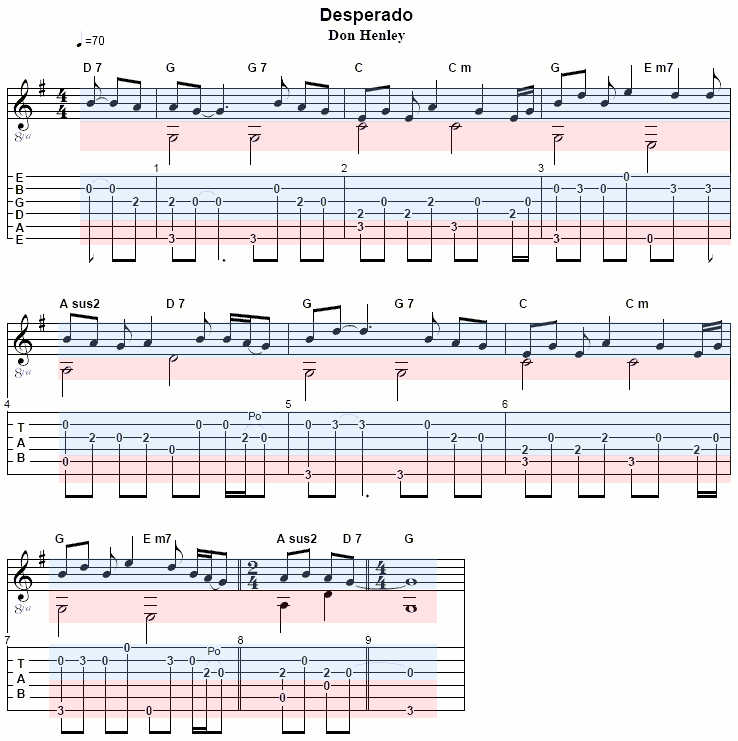
Measure one (1) contains a G and a G7, so enter a G on beats one (1) and three (3). Refer to the image below. Measure two (2) is very similar in that it contains two C-root chords, C and Cm so enter a C on beats one (1) and three (3). Measure three (3) has chords with different root notes a G and an Em7, so enter a G on beat one (1) and an E on beat three (3). Continue this process until all measures in the lower voice are completed. All notes should be entered as 1/2 notes except for measure eight (8), which would be 1/4 notes. When done, play the tablature to see that is sounds correct. If not make adjustments until it does.

The image above shows the complete base arrangement and yours should look very similar. The upper voice is highlighted in blue and the lower voice in red. Also if you are including standard notation as part of your arrangement, notice that the upper voice note stems are all pointing upwards, and the lower voice stems pointing downwards. Not only are you learning an arranging process, you are learning how to create publisher quality musical scores at the same time.
This concludes the first lesson. You may have noticed however that there are several places where there are voids in the arrangement, no notes being played in the melody and/or in the bass. No attempt has been made to fill in the voids or add any harmonization, and for a good reasons. The following three questions should be answered before adding detail to your arrangement.
- Is it in a guitar friendly key of C, A, G, E or D? These keys provide open strings, especially for the bass voice. Many times when you enter a melody from a lead sheet, it will be in a non-guitar friendly key and make the arrangement more difficult to play.
- Is it playable? Take your guitar and play the arrangement to determine the ease of playability.
- Does the upper voice fall primarily on the top three strings (G, B and High-E)? A good guideline is to limit the upper voice to those three strings.
If the answer to any of these questions is no, then the arrangement is a candidate for a new key, and it's much easier to transpose to a new key before you start adding complexity. For our purposes, we will keep this arrangement as is, and in the following lessons, modify it to create a complete arrangement. Now that we have the basics covered, the future lessons should be much shorter!!!!
One note before I stop. When you start creating your own arrangements, you might find it is consuming all of your time. Don't let it happen. All of you have a limited amount of time to devote to the guitar. Split your time wisely between playing and creating new arrangements. Your primary goal is to play the guitar, so don't let your guitar playing slide!!!!! It may take more time to create an arrangement, but there is no hurry in getting it completed.